
Cherry Cheesecake Cups

Bite-sized cherry cheesecake cookie cups — an easy semi-homemade dessert perfect for parties, potlucks, or an indulgent weeknight treat.
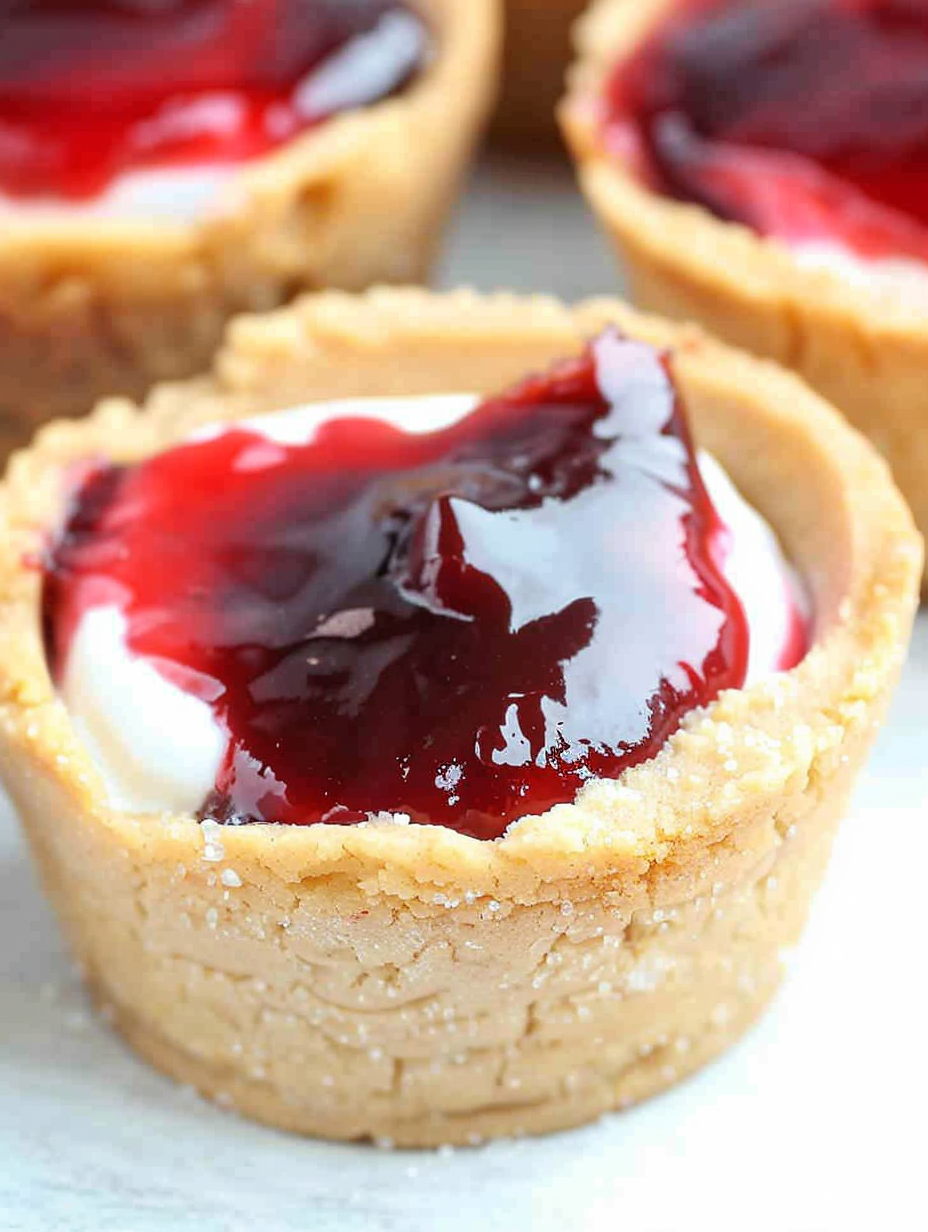
This Cherry Cheesecake Cookie Cups recipe is my go-to quick dessert whenever guests pop in or when I need something sweet that feels special but doesn’t require hours in the kitchen. I first discovered this method while juggling a busy weekend of school sports and wanted a treat that could be made fast, transported easily, and offered the nostalgic flavor of a diner-style cherry cheesecake in a neat, single-bite package. Using store-bought sugar cookie dough keeps the prep time minimal while still delivering a buttery, golden shell that cradles a creamy, tangy filling and bright cherry topping.
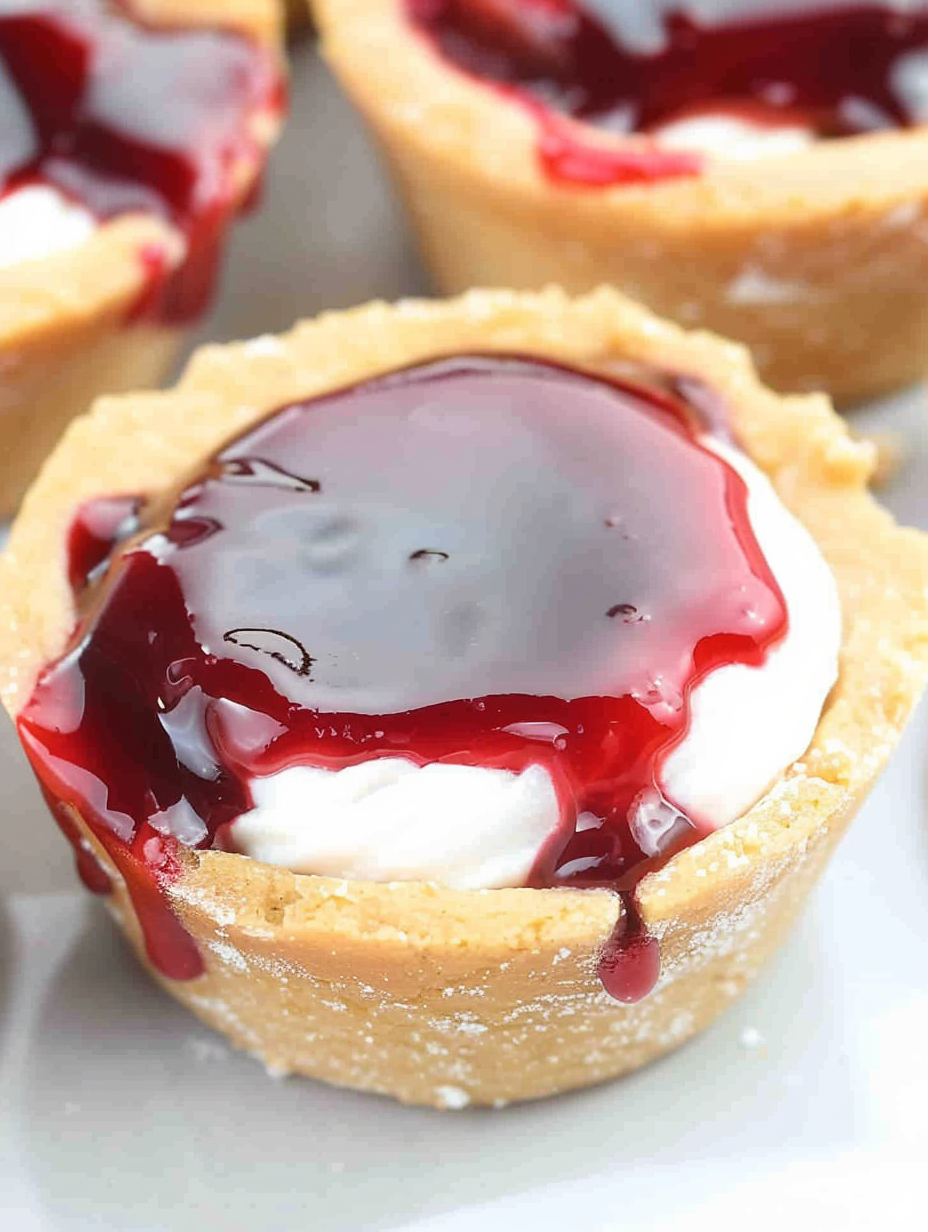
The texture is what I love most: the cookie cup bakes thin and crisp around the edges with a slight chew at the base, providing the perfect contrast to the airy cream cheese filling. The cherry pie filling on top adds a sweet-tart burst and a jewel-like finish that makes these irresistible. I often make a double batch for family gatherings; they disappear within minutes. Picky eaters, kids, and adults alike always come back for more, and the fact that they’re portable makes them ideal for outdoor picnics and bake sales.
Why You'll Love This Recipe
- Speed: Ready in under an hour from start to finish using store-bought cookie dough, with only 10 minutes active prep time.
- Accessibility: Uses pantry staples and one 8-ounce package of cream cheese, plus a can of cherry pie filling — no specialty ingredients required.
- Make-ahead friendly: Shells can be baked in advance and stored for 24 hours; filling can be made and chilled ahead for quick assembly.
- Crowd-pleaser: Bite-sized portions are perfect for parties, offering easy serving and portion control while remaining elegant.
- Customizable: Swap the cherry topping for other pie fillings, fresh fruit, or chocolate for seasonal variations and dietary adjustments.
- Minimal equipment: All you need is a muffin tin and a mixer for the filling, making cleanup fast and easy.
In my experience, these have been a lifesaver for last-minute gatherings. Once I brought them to a neighborhood potluck and several neighbors asked for the recipe on the spot. I love that this approach keeps the flavor of homemade without demanding complicated techniques or rare ingredients.
Ingredients
- Package sugar cookie dough: One standard package of refrigerated sugar cookie dough works perfectly and saves time. Look for a brand you trust like Pillsbury for consistent results, or use your favorite homemade dough if you prefer to control the butter and sugar.
- Cream cheese: One 8-ounce block of full-fat cream cheese, softened to room temperature for smooth mixing. Full-fat gives the best texture and flavor; avoid ultra-soft whipped varieties.
- Vanilla extract: 1 teaspoon of pure vanilla extract adds depth and balance to the filling; avoid artificial imitations when possible.
- Whipped topping: 1 cup of whipped cream topping (like Cool Whip) folded into the cream cheese for lightness. You can use freshly whipped heavy cream (1 cup heavy cream whipped to soft peaks) for a fresher taste.
- Cherry pie filling: One 21-ounce can of cherry pie filling provides the glossy, tart-sweet topping that makes these cups feel festive.
- Chocolate sprinkles (optional): A small handful for garnish if you want a little texture contrast and a touch of chocolate.
- From-scratch sugar cookie option: If you make dough at home, you will need 3 cups all-purpose flour, 1 teaspoon baking powder, 1 cup unsalted butter (2 sticks), 1 cup granulated sugar, 1 egg, and 1 teaspoon vanilla extract. Chill dough 30 minutes before shaping.
Instructions
Preheat and prepare: Set the oven to 350 degrees Fahrenheit. Grease a standard muffin tin or use nonstick spray to ensure cookie cups release easily. If using store-bought dough, work quickly so the dough does not become overly soft from hands or room temperature. Shape the cookie cups: Press approximately 1 to 2 tablespoons of cookie dough into each muffin well, forming a thin cup that covers the bottom and sides. Use your fingers or the back of a small measuring spoon to shape the walls evenly. For uniform cups, chill the filled pan for 5 minutes before baking. Bake: Bake the cups for 8 to 12 minutes at 350 degrees Fahrenheit, depending on muffin tin size and dough thickness. Look for the edges to become lightly golden; the centers may still be slightly soft but will firm as they cool. Cool and unmold: Allow the cookie cups to cool in the pan for 10 to 15 minutes to set, then carefully transfer to a wire rack to cool completely. For best results, cool at least 20 to 30 minutes before filling to avoid melting the filling. Make the filling: In a mixing bowl, beat 8 ounces of softened cream cheese with 1 teaspoon vanilla until smooth. Gently fold in 1 cup of whipped topping until light and evenly combined; avoid overmixing to keep the texture airy. Assemble: Spoon 1 to 2 tablespoons of the cream cheese mixture into each cookie cup, smoothing the tops. Add about 1 tablespoon of cherry pie filling on top of each filled cup, letting a bit of syrup cascade for shine. Finish with chocolate sprinkles if desired. Chill and serve: Chill assembled cups in the refrigerator for at least 20 to 30 minutes to let the filling set and the flavors meld. Serve chilled for best texture and flavor.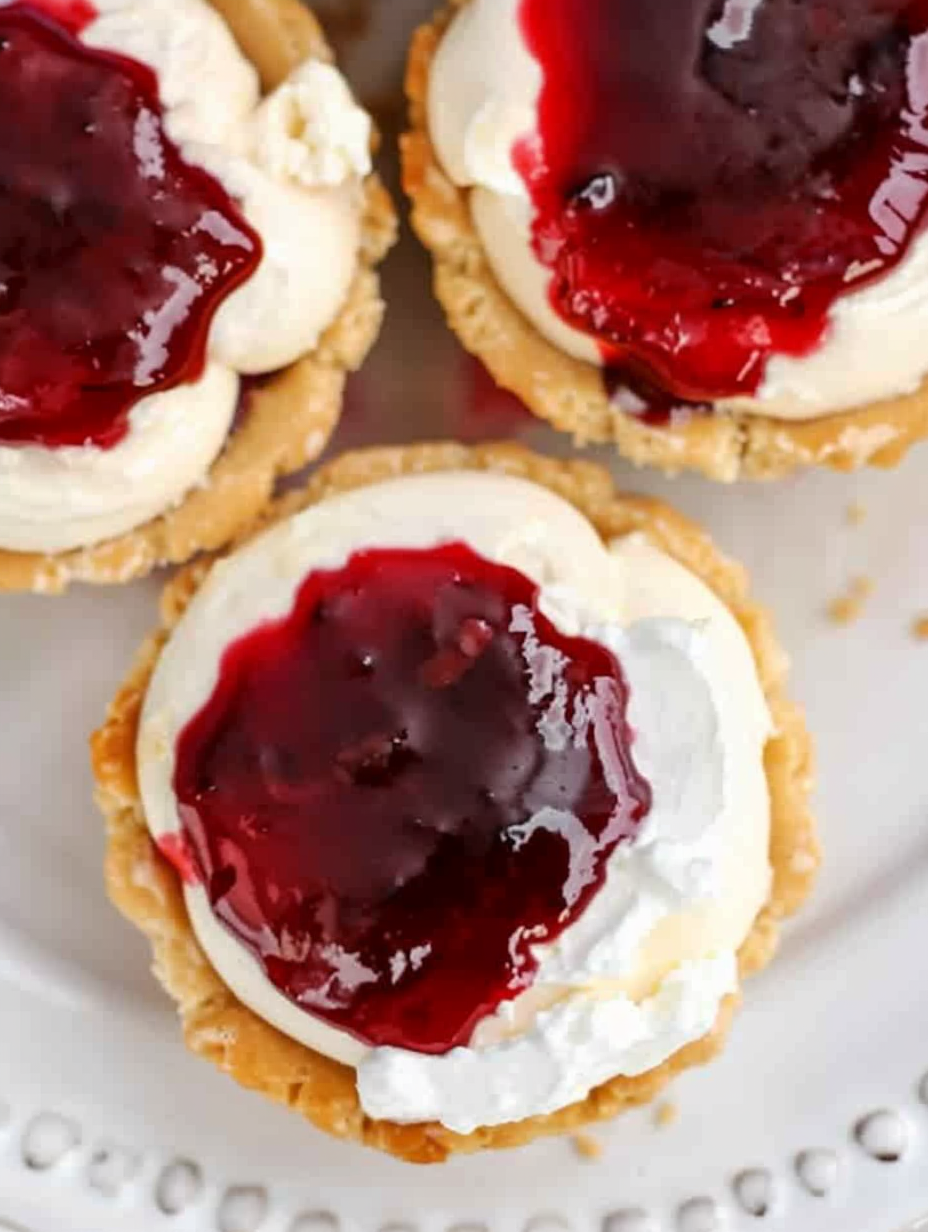
You Must Know
- Storage: Keep chilled in an airtight container for up to 3 days for best texture and freshness.
- Freezing: Assembled cups do not freeze well because the whipped filling may become watery; freeze baked empty shells up to 1 month and fill after thawing.
- Nutritional note: These are an indulgent treat, moderate in calories and sugar due to cookie shells and pie filling.
- Make-ahead: Bake shells the day before and store in a single layer; make filling the morning of to keep it light.
My favorite part is how these feel both upscale and familiar. I still remember making them for my daughter’s class party where every kid loved the bright cherry topping. They are simple enough to prepare between errands yet pretty enough for holiday dessert tables.
Storage Tips
For short-term storage, arrange assembled cups in a single layer in an airtight container and refrigerate for up to 3 days. Avoid stacking them to prevent the filling from smearing. If you plan to prepare components ahead, bake and cool the cookie shells up to 24 hours in advance and store them in a sealed container at room temperature with layers separated by parchment paper. Freeze baked, unfilled shells for up to 1 month on a baking sheet, then transfer to a freezer bag. To reheat frozen shells, thaw at room temperature and fill just before serving. Always chill assembled cups well before serving to keep the filling stable.
Ingredient Substitutions
If you want a lighter version, replace the whipped topping with freshly whipped cream made from 1 cup heavy cream whipped to soft peaks; fold it into the cream cheese. For a gluten-free option, substitute a gluten-free sugar cookie dough or make a shortbread-style shell using gluten-free flour blends. If cherries are not available, use blueberry or strawberry pie filling, or top with fresh fruit and a small drizzle of jam. To reduce sugar, look for reduced-sugar pie fillings and use 1/4 cup less granulated sugar in the homemade dough. Note that substitutions alter texture and sweetness, so adjust garnish and chilling time accordingly.
Serving Suggestions
Present these on a tiered dessert stand for parties or arrange them on a platter with fresh mint leaves for a pop of color. Pair with coffee or a light dessert wine like Moscato. For a brunch twist, serve alongside lemon bars or fresh fruit salad. Garnish with a light dusting of confectioners' sugar or a small dollop of lemon zest-infused whipped cream to complement the cherry topping. These cups also travel well in a shallow pastry box for picnics and office parties.
Cultural Background
The concept of miniature cheesecakes traces roots to European and American pastry traditions that favor individual-sized desserts for elegance and convenience. Cherry-topped cheesecakes became particularly popular in American diners and bakeries in the mid-20th century, where canned pie fillings offered a quick, colorful finish. This version merges cookie-based tart shells with classic cheesecake flavors, reflecting the home baker’s desire for approachable techniques that still deliver the comforting flavors of traditional cheesecake.
Seasonal Adaptations
Switch toppings with the seasons: use canned apple pie filling and a touch of cinnamon for fall, lemon curd and fresh raspberries in spring, or a mixed berry compote in summer. For winter holidays, swap cherries for cherry-vanilla compote and add a sprinkle of crushed peppermint for a festive touch. You can also add spices like cinnamon or cardamom to the cookie dough for extra warmth in cold months. Simple swaps keep the base technique the same while highlighting seasonal produce.
Meal Prep Tips
To streamline baking for events, bake several pans of shells and freeze unfilled cups flat in a single layer before transferring to a sealed bag. Make the filling the morning of and keep it chilled until assembly to preserve its volume. Use a small cookie scoop for consistent dough amounts, and a 1-tablespoon scoop for filling to ensure even portions. Label containers with assembly instructions so anyone helping you can finish them quickly right before serving.
These cherry cheesecake cups have become a family favorite because they combine speed, flavor, and elegance without fuss. Whether you use store-bought dough or make your own, these bite-sized treats invite customization and are always a welcomed offering at any gathering. Enjoy making them your own and sharing them with people you love.
Pro Tips
Chill the muffin tin with shaped dough for 5 minutes before baking to help the cups keep their shape.
Soften cream cheese to room temperature for smoother filling; cold cream cheese will create lumps.
Use a small cookie scoop or tablespoon to portion dough evenly for uniform cup sizes.
If using homemade dough, refrigerate the dough ball for 30 minutes before shaping to make handling easier.
Avoid overmixing the filling to preserve a light, airy texture; fold whipped topping gently.
This nourishing cherry cheesecake cups recipe is sure to be a staple in your kitchen. Enjoy every moist, high protein slice — it is perfect for breakfast or as a wholesome snack any time.
Tags
Cherry Cheesecake Cups
This Cherry Cheesecake Cups recipe makes perfectly juicy, tender, and flavorful steak every time! Serve with potatoes and a side salad for an unforgettable dinner in under 30 minutes.
Ingredients
From-scratch sugar cookie (optional)
Instructions
Preheat and prepare
Preheat oven to 350 degrees Fahrenheit. Grease a muffin tin or spray with nonstick spray. Work quickly with store-bought dough to prevent it from becoming too soft.
Shape cookie cups
Press 1 to 2 tablespoons of cookie dough into each muffin well, creating a thin shell along the bottom and sides. Chill the filled pan briefly if dough becomes too soft.
Bake
Bake at 350 degrees Fahrenheit for 8 to 12 minutes until edges are lightly golden. Times vary by tin size; look for golden edges as your visual cue.
Cool and unmold
Cool cookie cups in the tin for 10 to 15 minutes, then remove to a wire rack and cool completely, about 20 to 30 minutes, before filling.
Prepare filling
Beat 8 ounces softened cream cheese with 1 teaspoon vanilla until smooth. Fold in 1 cup whipped topping until light and evenly combined, taking care not to overmix.
Assemble and chill
Spoon 1 to 2 tablespoons of filling into each cooled shell, top with about 1 tablespoon cherry pie filling, garnish if desired, and chill for at least 20 to 30 minutes before serving.
Last Step: Please leave a rating and comment letting us know how you liked this recipe! This helps our business to thrive and continue providing free, high-quality recipes for you.
Nutrition
Did You Make This?
Leave a comment & rating below or tag
@silksavor on social media!
Categories:
You might also like...

Parmesan Herb Crusted Salmon
Tender baked salmon crowned with a garlicky Parmesan herb crust, bright lemon, and buttery crunch. Simple to make, stunning to serve, and irresistibly flavorful.

Caramel Apple Cheesecake Bars
Buttery graham crust, silky cheesecake, and cinnamon-kissed apples under a crunchy crumb, finished with glossy caramel. A fall crowd-pleaser you will crave.

Homemade Green Bean Casserole
Tender green beans in silky mushroom cream, crowned with crispy onions. A comforting holiday side made entirely from scratch that always disappears fast.
Did You Make This?
Leave a comment & rating below or tag @silksavor on social media!
Rate This Recipe
Share This Recipe
Enjoyed this recipe? Share it with friends and family, and don't forget to leave a review!
Comments (1)
This recipe looks amazing! Can't wait to try it.
Comments are stored locally in your browser. Server comments are displayed alongside your local comments.

Hi, I'm Julia!
What's Popular

30-Minute Meals!
Join to receive our email series which contains a round-up of some of our quick and easy family favorite recipes.