
Christmas Cheesecake Bars

Buttery sugar-cookie crust topped with a silky cheesecake layer, bright cherry pie filling, and a crunchy almond crumble—perfect for holiday gatherings.
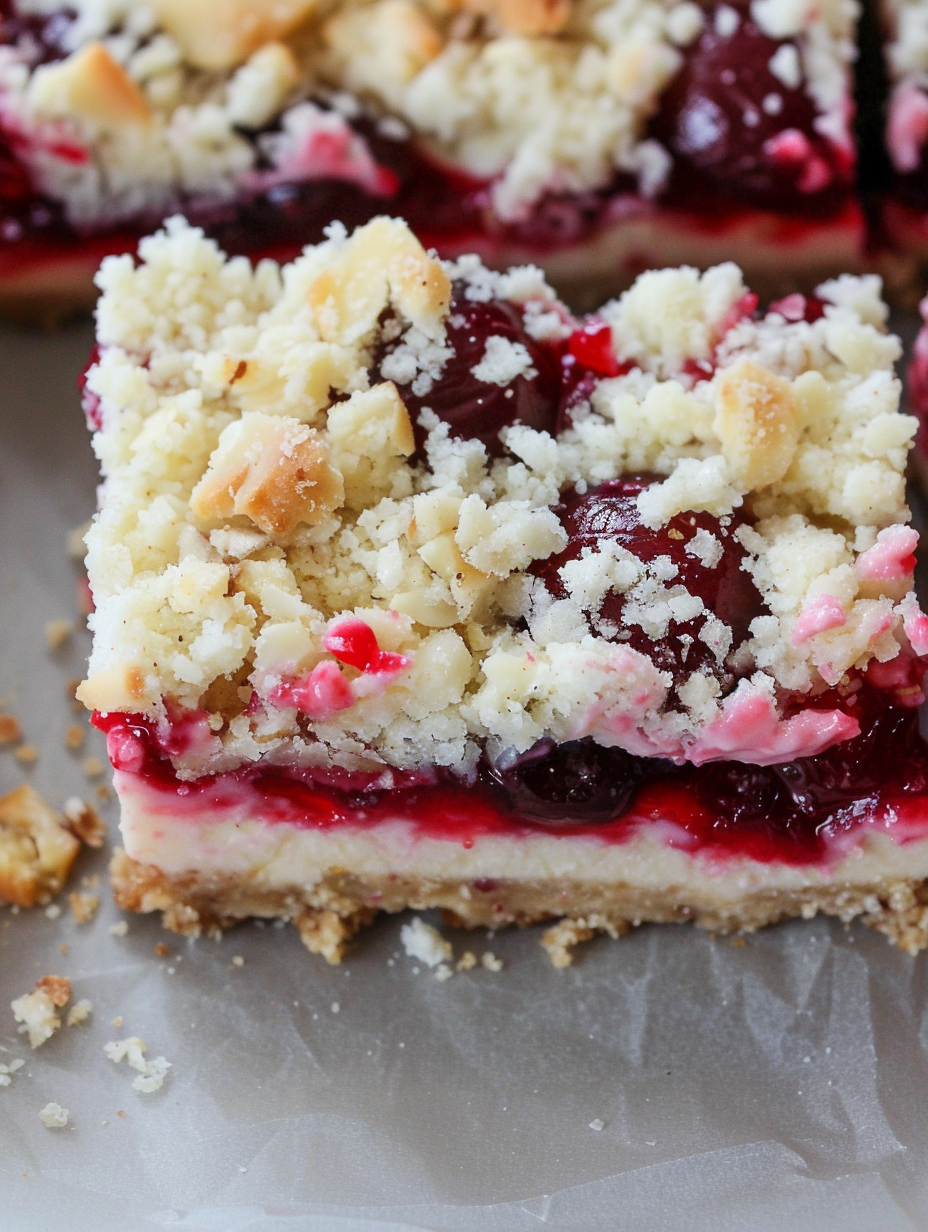
This holiday treat has become a centerpiece at our family gatherings: Christmas Cheesecake Bars that marry a sweet, sturdy sugar-cookie base with a lusciously creamy cheesecake layer, a jewel-bright cherry topping, and a buttery almond crumble. I first landed on this combination one December when I wanted something that felt festive but required less hands-on time than a full cheesecake. The bars travel well, slice neatly, and the contrast of textures—the crisp base, the velvet cheesecake, the glossy cherries and the crunchy crumble—keeps everyone coming back for another piece.
I discovered the recipe during a frantic season of cookie exchanges and realized these bars checked every box: make-ahead friendly, easy to scale, and simple enough for less experienced bakers. The flavor profile is nostalgic—sweet sugar-cookie notes with the gentle tang of cream cheese and the bright pop of cherry. They remind me of neighborhood holiday potlucks where a pan of bars disappears before the carol sing begins. Each bite feels like a miniature celebration, and the recipe has been modified slightly over the years to improve texture and slicing performance.
Why You'll Love This Recipe
- One-pan finish: everything bakes in an 8 x 8-inch pan for easy assembly, transport, and cleanup—ideal for holiday parties and potlucks.
- Quick prep, great payoff: with just 1 hour and 30 minutes from start to refrigerator, you get impressive results without an all-day commitment.
- Pantry-friendly staples: uses an 8.5-ounce sugar cookie mix, cream cheese, an egg, and canned cherry pie filling—no specialty shopping required.
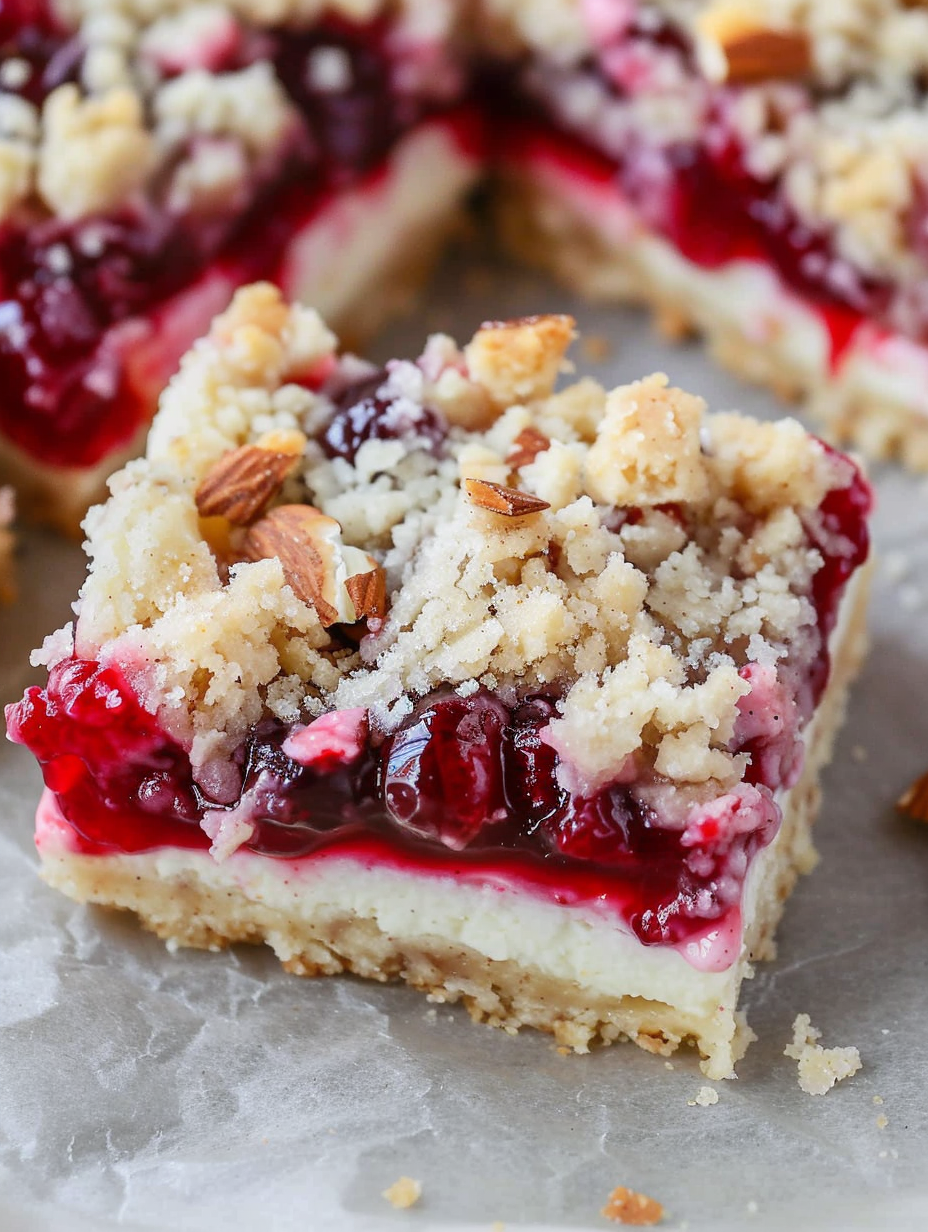
- Textural contrast: the buttery cookie crust and almond crumble frame a silky cheesecake layer and jewel-like cherries for a multi-texture experience.
- Make-ahead and travel-ready: cool completely, refrigerate, or freeze for later; they keep shape well for gift boxes or dessert tables.
- Accessible for bakers of all skill levels: simple folding and mixing techniques, with precise visual cues to prevent overbaking.
In my kitchen these bars are a crowd-pleaser. Over the years I’ve watched them convert skeptical guests who say they ‘‘don’t really like cherry desserts’’ into enthusiastic seconds-seekers. The almond crumble was an experiment that became permanent after my sister declared it indispensable. These bars have accompanied cookie swaps, office parties, and even a last-minute neighbor drop-off when we forgot to buy a hostess gift—everyone was delighted.
Ingredients
- Sugar cookie mix (8.5-ounce pouch): Choose a reliable brand you know, like Pillsbury or store-brand equivalents. The pre-made mix gives a consistent sweet foundation and binds reliably when combined with cold butter. The flavor is neutral, allowing the cheesecake and cherry topping to shine.
- Butter, 4 tablespoons, cold and cubed: Use unsalted butter if possible so you can control salt in the rest of the dessert. Cold butter cut into the cookie mix yields a tender, shortbread-like crumb for the crust and crumble.
- Cream cheese, 8 ounces, softened: Full-fat cream cheese gives the best texture and flavor. Soften at room temperature for about 30 minutes so it blends silky without lumps; avoid the microwave as it can become too soft and watery.
- Granulated sugar, 1/4 cup: Balances the tang of the cream cheese without overwhelming sweetness. For a slight depth, use super-fine sugar if you have it for quicker dissolution.
- All-purpose flour, 1 tablespoon: A small amount stabilizes the filling and helps it set with a smooth mouthfeel.
- Vanilla extract, 1/2 teaspoon: Pure vanilla is worth it here; it brightens the cheese layer and complements the cherries.
- Egg, 1 large: Acts as the binder in the cheesecake layer and helps the filling hold when sliced.
- Cherry pie filling, 3/4 can (about 1 3/4 cups): Use a good-quality canned filling—look for whole or halved cherries in a glossy syrup for the most attractive topping. If you can find a brand you like, stick with it for consistent results.
- Sliced almonds, 1/3 cup: Added to the reserved crumble, they toast in the oven and add a nutty crunch that balances the soft layers.
Instructions
Prepare the pan and oven: Preheat the oven to 350 degrees Fahrenheit. Lightly spray an 8 x 8-inch baking pan with non-stick spray and line it with parchment if you prefer easy removal. A metal pan gives crisper edges; glass will hold heat longer—adjust bake by a few minutes if using glass. Make the crumb base: In a small bowl, combine the 8.5-ounce sugar cookie mix with the cold, cubed butter. Use a fork or a pastry cutter to work the butter into the mix until the texture is crumbly with pea-sized pieces. Reserve 3/4 cup of this crumb for the topping and press the remainder firmly into the bottom of the prepared pan in an even layer. Bake for 10 minutes, then place in the refrigerator to cool quickly; a warm crust will make the filling runny. Mix the cheese layer: While the crust cools, beat the 8 ounces of softened cream cheese with 1/4 cup sugar, 1 tablespoon flour, 1/2 teaspoon vanilla, and 1 large egg. Use a hand mixer on medium speed and scrape the bowl once or twice—beat until smooth and creamy, about 1 to 2 minutes. Avoid overbeating which incorporates too much air and can cause the filling to crack. Assemble the layers: Spread the cheesecake mixture evenly over the cooled crust, covering it completely. Spoon the cherry pie filling over the cheese layer in an even layer—use the back of a spoon to distribute without pressing into the cheese. The cherries should sit on top, creating a glossy finish once baked. Finish with crumble and bake: Stir the 1/3 cup sliced almonds into the reserved 3/4 cup crumb mixture and sprinkle evenly over the cherries. Bake in the preheated 350 F oven for 40 minutes, or until the center is mostly set and the edges show a slight golden hue. The center may still jiggle a bit; it will firm as it chills. Cool and chill: Remove from the oven and cool on a wire rack for 30 minutes at room temperature, then refrigerate until cold and firm, at least 2 hours or overnight for clean slices.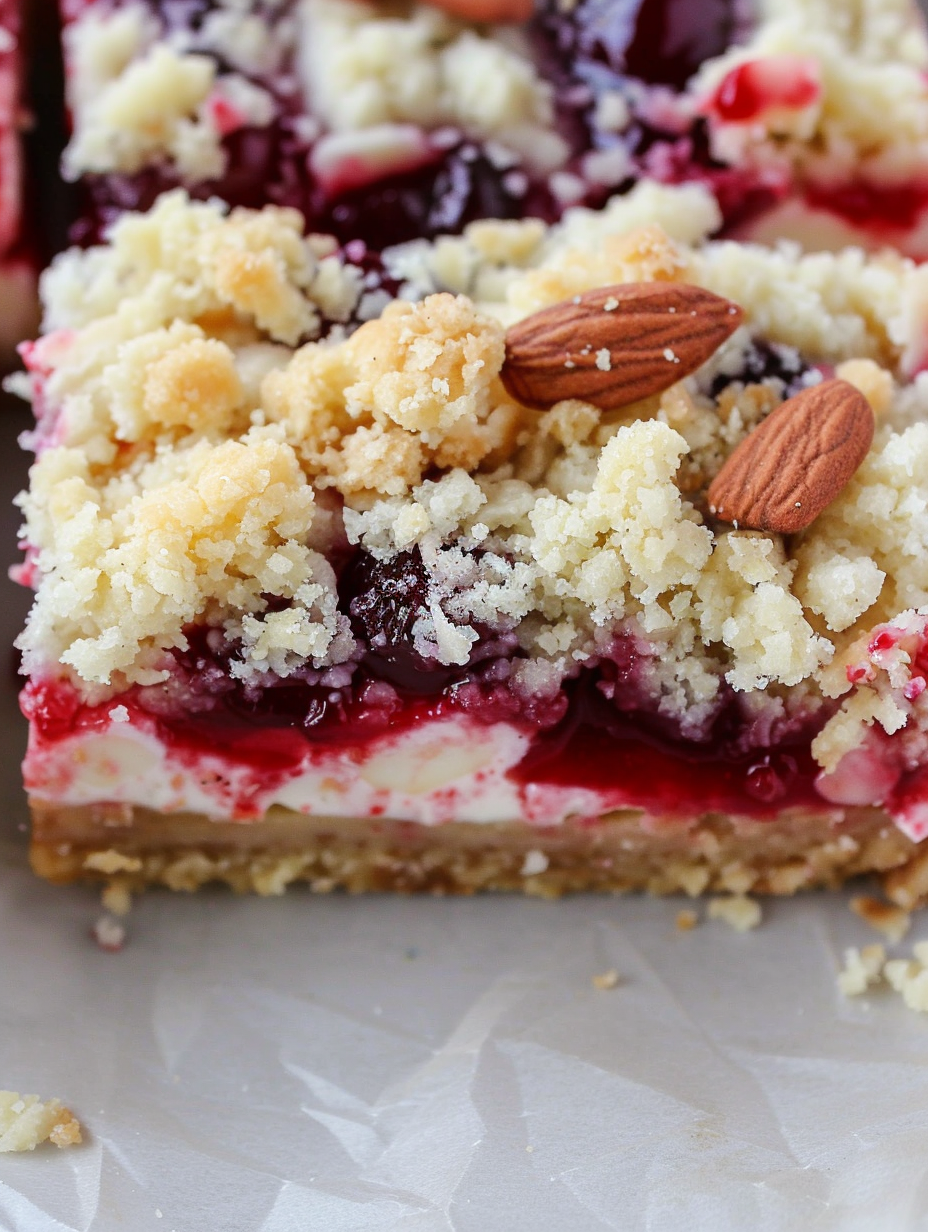
You Must Know
- These keep well in the refrigerator for up to 5 days; wrap the pan tightly or transfer sliced bars to an airtight container to avoid odor absorption.
- Freeze for up to 3 months. Slice, flash-freeze on a tray, then stack with parchment between layers in a freezer-safe container.
- Bars are moderately high in sugar and fat due to the cookie mix, butter, and cream cheese—serve smaller portions for balanced indulgence.
- Allergens to note: contains dairy, egg, and tree nuts; the cookie mix will contain wheat unless you use a gluten-free alternative.
My favorite part is how reliably festive the bars look without much fuss. I often bring them to holiday gatherings where presentation matters but time is limited—cooling overnight produces the cleanest slices and the cherry layer retains a beautiful shine. Friends always comment on the crunch of the almonds, which I resisted at first but now consider essential to the contrast of textures.
Storage Tips
Store bars in a single layer in the refrigerator for up to five days. If stacking is necessary, separate layers with parchment or wax paper to prevent sticking and preserve the crumble texture. For freezing, cut into bars and freeze individually on a baking sheet until firm, then transfer to a freezer-safe bag with parchment between layers; label with the date and use within three months. Thaw overnight in the fridge and bring to room temperature for 20 minutes before serving for the best texture.
Ingredient Substitutions
If you need dairy-free options, use a dairy-free cream cheese alternative and a plant-based butter substitute; keep in mind the texture will be slightly different and may be less creamy. For a gluten-free version, choose a certified gluten-free sugar-cookie mix and ensure the pie filling is gluten-free. To change the nut component, swap sliced almonds for chopped pecans or omit nuts entirely and increase reserved crumbs by 1/4 cup. You can also substitute the cherry filling with blueberry or raspberry pie filling for a different flavor profile.
Serving Suggestions
Serve chilled squares on a festive platter with a dusting of powdered sugar or a small dollop of whipped cream. These bars pair beautifully with strong coffee, spiced tea, or a fortified wine after dinner. For a holiday brunch, offer small squares alongside orange segments and roasted nuts. Garnish with a few fresh cherries or mint sprigs when in season for an elevated presentation.
Cultural Background
Layered bars combining a cookie-like base with a custard or cheese layer are common in American baking, reflecting the tradition of transportable, shareable desserts for potlucks and holidays. The use of canned pie filling dates back to mid-20th-century convenience cooking and became popular for its reliability and long shelf life. This style of bar combines nostalgic pantry ingredients with modern shortcuts to produce a dessert that still feels celebratory.
Seasonal Adaptations
In winter, use cherry or cranberry-apple pie filling with a sprinkle of orange zest in the cheesecake layer for a bright lift. For summer gatherings, swap cherries for fresh macerated berries and reduce bake time slightly, or omit the top crumble for a lighter finish. Holiday variations can include adding 1/2 teaspoon ground cinnamon to the crust or a tablespoon of almond liqueur to the cheese layer for an adult twist.
Meal Prep Tips
Make the base and crumble a day ahead and refrigerate. Prepare the cheesecake filling just before assembly to avoid overmixing. If you are baking for a crowd, double the recipe and bake in a 9 x 13-inch pan—watch baking time closely. For gift trays, chill the bars until very firm, then cut with a warm, dry knife for clean edges and wrap individually in parchment or cellophane.
These bars are one of those recipes I tweak slightly each season but always return to. They are forgiving, portable, and reliably loved—perfect for making ahead and sharing. Try them for your next holiday gathering and make them your own with a favorite fruit topping or nut swap; I promise they’ll be requested again.
Pro Tips
Soften cream cheese at room temperature for about 30 minutes for a lump-free filling.
Chill the crust before adding the cheese layer to prevent the filling from soaking in.
Reserve some crumb for the topping to add texture and prevent the bars from looking flat.
Use a sharp knife warmed under hot water and wiped dry to slice clean squares.
This nourishing christmas cheesecake bars recipe is sure to be a staple in your kitchen. Enjoy every moist, high protein slice — it is perfect for breakfast or as a wholesome snack any time.
Tags
Christmas Cheesecake Bars
This Christmas Cheesecake Bars recipe makes perfectly juicy, tender, and flavorful steak every time! Serve with potatoes and a side salad for an unforgettable dinner in under 30 minutes.
Ingredients
Crust & Topping
Cheesecake Filling
Instructions
Preheat and prepare pan
Preheat oven to 350 degrees Fahrenheit. Spray an 8 x 8-inch pan with non-stick spray and optionally line with parchment for easy removal.
Make crumb mixture and reserve
Combine the sugar cookie mix with cold cubed butter using a fork or pastry cutter until crumbly. Reserve 3/4 cup for the topping and press the rest firmly into the bottom of the pan. Bake for 10 minutes, then refrigerate to cool quickly.
Prepare the cheese layer
Beat softened cream cheese with sugar, flour, vanilla, and the egg until smooth and creamy, taking care not to overbeat.
Assemble layers
Spread the cheese mixture over the cooled crust, spoon cherry pie filling on top and spread evenly. Mix sliced almonds into the reserved crumbs and sprinkle over the cherries.
Bake then chill
Bake at 350 F for 40 minutes until mostly set. Cool 30 minutes at room temperature, then refrigerate until cold and firm, at least 2 hours or overnight.
Last Step: Please leave a rating and comment letting us know how you liked this recipe! This helps our business to thrive and continue providing free, high-quality recipes for you.
Nutrition
Did You Make This?
Leave a comment & rating below or tag
@silksavor on social media!
Categories:
You might also like...

Parmesan Herb Crusted Salmon
Tender baked salmon crowned with a garlicky Parmesan herb crust, bright lemon, and buttery crunch. Simple to make, stunning to serve, and irresistibly flavorful.

Caramel Apple Cheesecake Bars
Buttery graham crust, silky cheesecake, and cinnamon-kissed apples under a crunchy crumb, finished with glossy caramel. A fall crowd-pleaser you will crave.

Homemade Green Bean Casserole
Tender green beans in silky mushroom cream, crowned with crispy onions. A comforting holiday side made entirely from scratch that always disappears fast.
Did You Make This?
Leave a comment & rating below or tag @silksavor on social media!
Rate This Recipe
Share This Recipe
Enjoyed this recipe? Share it with friends and family, and don't forget to leave a review!
Comments (1)
This recipe looks amazing! Can't wait to try it.
Comments are stored locally in your browser. Server comments are displayed alongside your local comments.

Hi, I'm Julia!
What's Popular

30-Minute Meals!
Join to receive our email series which contains a round-up of some of our quick and easy family favorite recipes.