
>>

No-bake, five-ingredient Christmas tree cake truffles with a creamy cake-and-cream cheese center coated in vanilla bark — perfect for gifting and cookie trays.
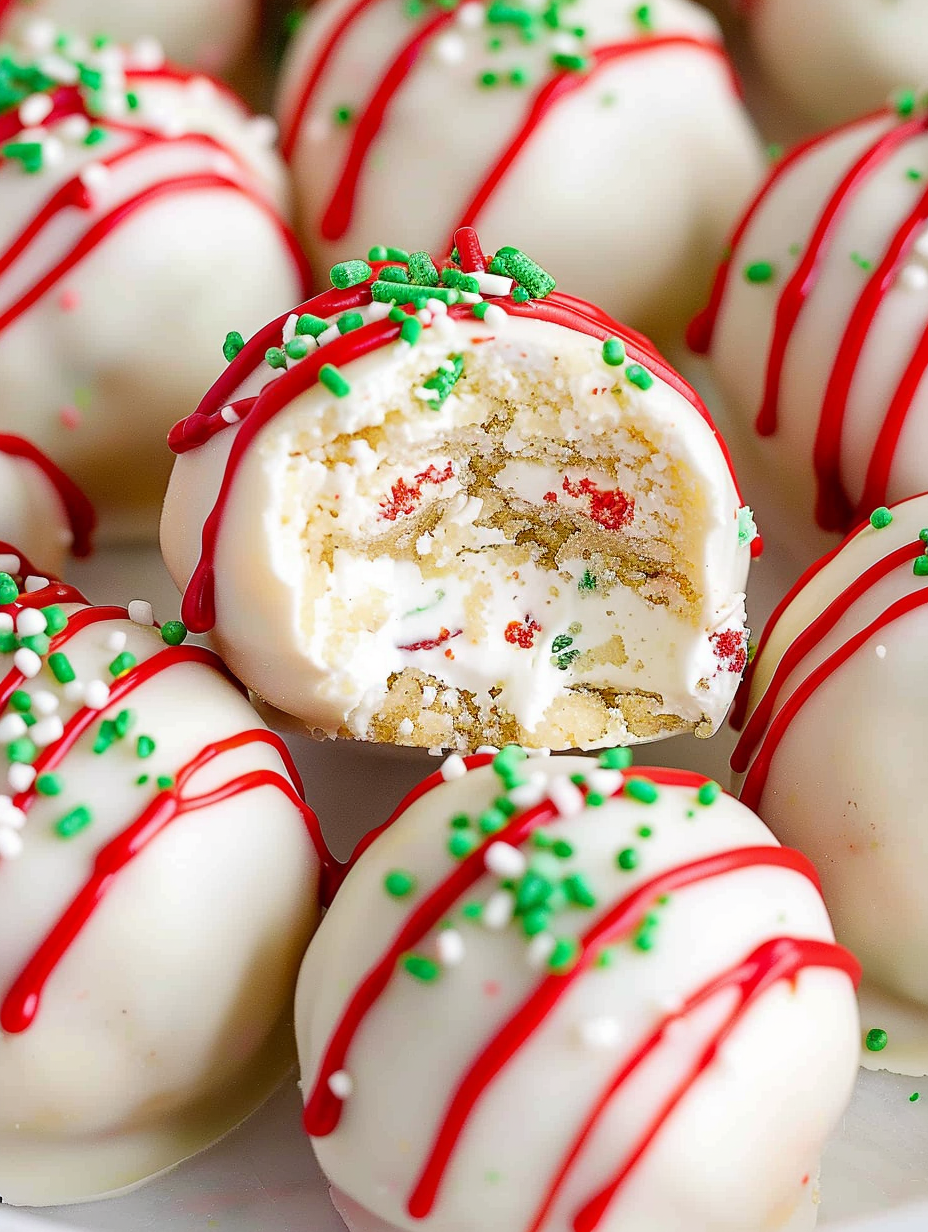
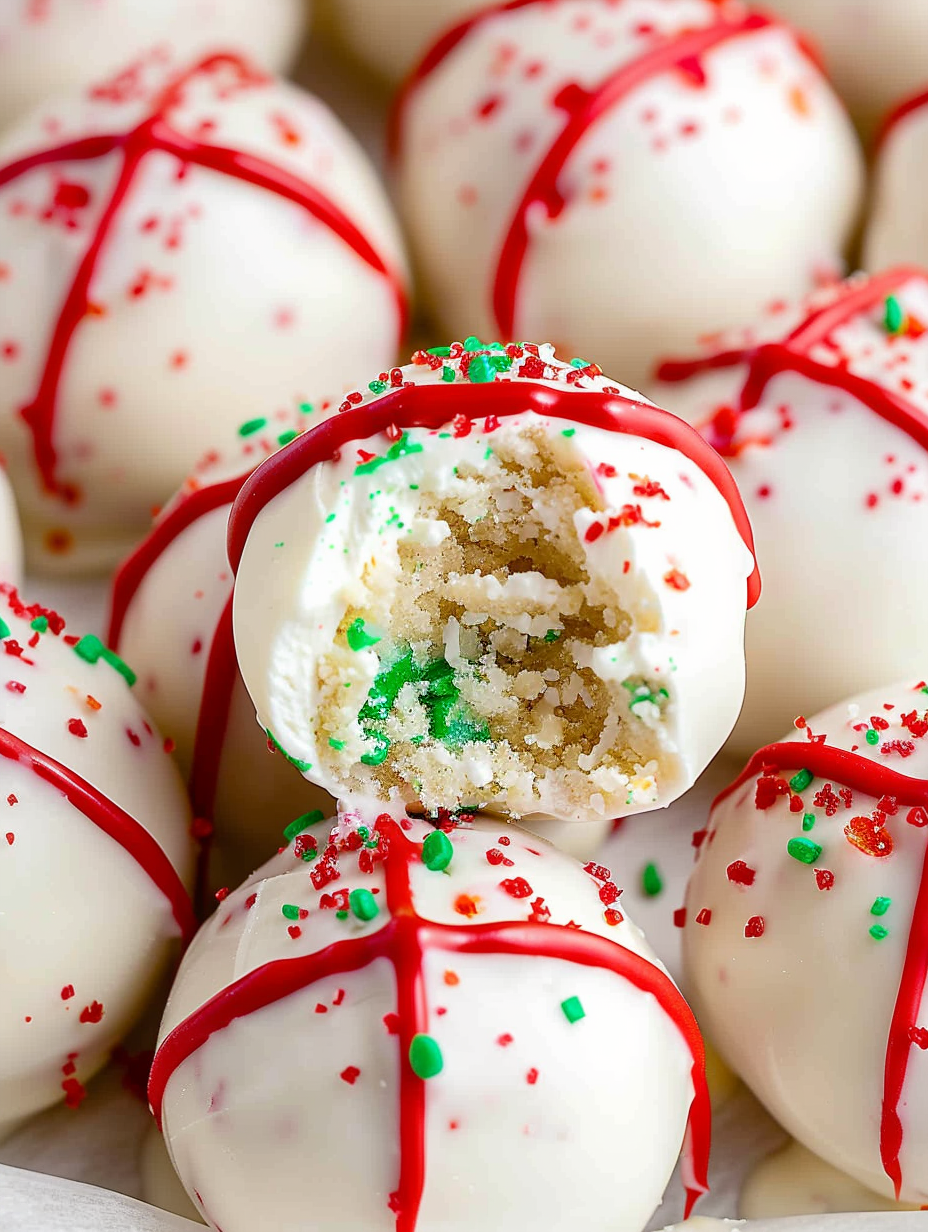
These little Christmas tree cake truffles are my favorite last-minute holiday secret. I first made them the year my kids wanted to take a treat to their school party but I had no time for baking. Using two boxes of Little Debbie Christmas Tree Cakes and a brick of cream cheese, I turned snack cakes into an elegant festive bite that somehow feels both nostalgic and new. The texture is creamy and cake-like inside with a crisp vanilla coating on the outside, and the sprinkle and red-drizzle decorations make them look like tiny decorated trees. They’re sweet but balanced by the tang of the cream cheese, which keeps each bite from feeling heavy.
I love that these take very little hands-on time and are ideal for prepping ahead. I discovered that freezing the formed balls before dipping helps them hold their shape and keeps the coating from tearing. These are perfect when you need a crowd-pleasing item for cookie trays, classroom parties, or edible gifts in cellophane bags. They travel well, can be stored in the fridge for a week, and freeze beautifully for holiday planning. The entire process is approachable even for a beginner cook, which is why they’ve become a staple on my holiday to-do list.
When I brought a platter of these to a neighborhood cookie exchange, neighbors guessed I’d spent hours baking. They were stunned to learn they’re made from pre-packaged cakes and cream cheese. That moment — seeing grownups and kids excited to try something so simple — is why I keep this recipe in my holiday arsenal.

My favorite part is how festive they look despite minimal effort. Years ago, a friend took a box to a holiday potluck and returned with requests for the recipe — and a few orders to make more. They’re reliably popular with kids and adults alike, and every batch I’ve made disappears within hours.
Store finished truffles in a single layer in an airtight container with parchment between layers to prevent sticking. At room temperature the coating may soften, so refrigeration is best for maintaining shape and texture. For gifting, place in a small box lined with wax paper and include a small cold pack for long journeys. To freeze, arrange on a tray until solid, then transfer to a freezer-safe container for up to three months. Thaw in the refrigerator for several hours before serving to preserve texture and avoid condensation on the coating.
If you can’t find vanilla almond bark, use white candy melts or white chocolate chips tempered or mixed with a teaspoon of coconut oil for easier melting. For a chocolate version, swap the snack cakes for Little Debbie chocolate tree cakes and use milk or dark coating. For a nut-free option, check labels and use a soy- or palm-oil-based coating labeled nut-free. If you want a less sweet center, use neufchatel cheese or reduce the frosting content by substituting a tablespoon of cocoa powder to balance sweetness.
Arrange on a holiday platter with other small bites like peppermint bark, thumbprint cookies, and salted nuts for contrast. Garnish with extra edible glitter or tiny sprinkles to mimic ornaments. They pair well with hot cocoa or a strong coffee. For a dessert buffet, place the truffles in mini paper cups and label flavors if you’ve made variations like chocolate or peppermint.
Transforming packaged cakes into truffles is a decades-old American holiday shortcut that blends convenience with decorative flair. Similar to cake pops and cookie truffles, this technique evolved from home cooks seeking expedited ways to create homemade-feeling gifts from store-bought components. The Christmas tree snack cake, a nostalgic seasonal treat, lends instantly recognizable flavor and shape translated into a bite-sized confection that celebrates holiday aesthetics.
For winter variations, add a pinch of cinnamon or orange zest to the center for warmth. Swap green sprinkles and red drizzle for pastel colors at Easter or red-and-pink for Valentine’s Day. For a Halloween twist, use orange icing and black sprinkles or candy eyes. The technique remains the same; only the coating colors and decorations change to suit the season.
Make the centers up to a month in advance and freeze them uncoated for quick assembly on the day of a party. Keep an assembly station with melted coatings in separate bowls and small spoons or a fork for dipping to speed production. Use a tabletop fan on low to help coatings set faster without condensation. Label containers with the production date when freezing so you can rotate supplies during the holidays.
These truffles are a small, joyful addition to any holiday table. They’re quick to make, easy to share, and always a crowd-pleaser — I hope you enjoy them as much as my family does.
Soften the cream cheese at room temperature for 20 to 30 minutes for easier mixing and a smoother center.
Freeze the formed balls for at least 30 minutes before dipping to prevent the coating from cracking.
Use a one-tablespoon scoop for uniform portions so they set and present consistently.
Warm coatings in short intervals and stir between to avoid overheating which can make the shell thin and prone to bloom.
If the coating thickens while dipping, briefly reheat in 10-second bursts and stir; do not overheat.
This nourishing christmas tree cake truffles recipe is sure to be a staple in your kitchen. Enjoy every moist, high protein slice — it is perfect for breakfast or as a wholesome snack any time.
Yes. Form the balls and freeze them uncoated for up to 3 months. Thaw in the refrigerator before dipping so the coating adheres well.
Use fine green sanding sugar or green nonpareils for a similar decorative effect; add immediately after dipping so they stick.
This Christmas Tree Cake Truffles recipe makes perfectly juicy, tender, and flavorful steak every time! Serve with potatoes and a side salad for an unforgettable dinner in under 30 minutes.
Unwrap the snack cakes and break them into fine crumbs in a large mixing bowl using your hands or short pulses in a food processor.
Add softened cream cheese and beat with an electric mixer until fully combined, scraping the bowl as needed for a smooth, homogeneous mixture.
Use a one-tablespoon scoop to portion the mixture into 32 portions, roll each into a ball, and place on parchment-lined baking sheet.
Freeze the balls for 30 to 60 minutes so they are firm and easier to dip without losing shape.
Melt the vanilla almond bark according to package directions or over a double boiler. Dip each truffle using a fork, let excess drip off, and place back on parchment.
Immediately sprinkle green sugar on the wet coating, melt red candy melts and drizzle over the truffles, then allow coating to fully harden at room temperature or refrigerate briefly.
Last Step: Please leave a rating and comment letting us know how you liked this recipe! This helps our business to thrive and continue providing free, high-quality recipes for you.
Leave a comment & rating below or tag
@silksavor on social media!

Tender baked salmon crowned with a garlicky Parmesan herb crust, bright lemon, and buttery crunch. Simple to make, stunning to serve, and irresistibly flavorful.

Buttery graham crust, silky cheesecake, and cinnamon-kissed apples under a crunchy crumb, finished with glossy caramel. A fall crowd-pleaser you will crave.

Tender green beans in silky mushroom cream, crowned with crispy onions. A comforting holiday side made entirely from scratch that always disappears fast.
Leave a comment & rating below or tag @silksavor on social media!
Enjoyed this recipe? Share it with friends and family, and don't forget to leave a review!
This recipe looks amazing! Can't wait to try it.
Comments are stored locally in your browser. Server comments are displayed alongside your local comments.

Join to receive our email series which contains a round-up of some of our quick and easy family favorite recipes.
