
>>

Hearty green peppers filled with savory ground beef, tender rice, and a bright tomato sauce. A perfect weeknight dinner that freezes beautifully for later.
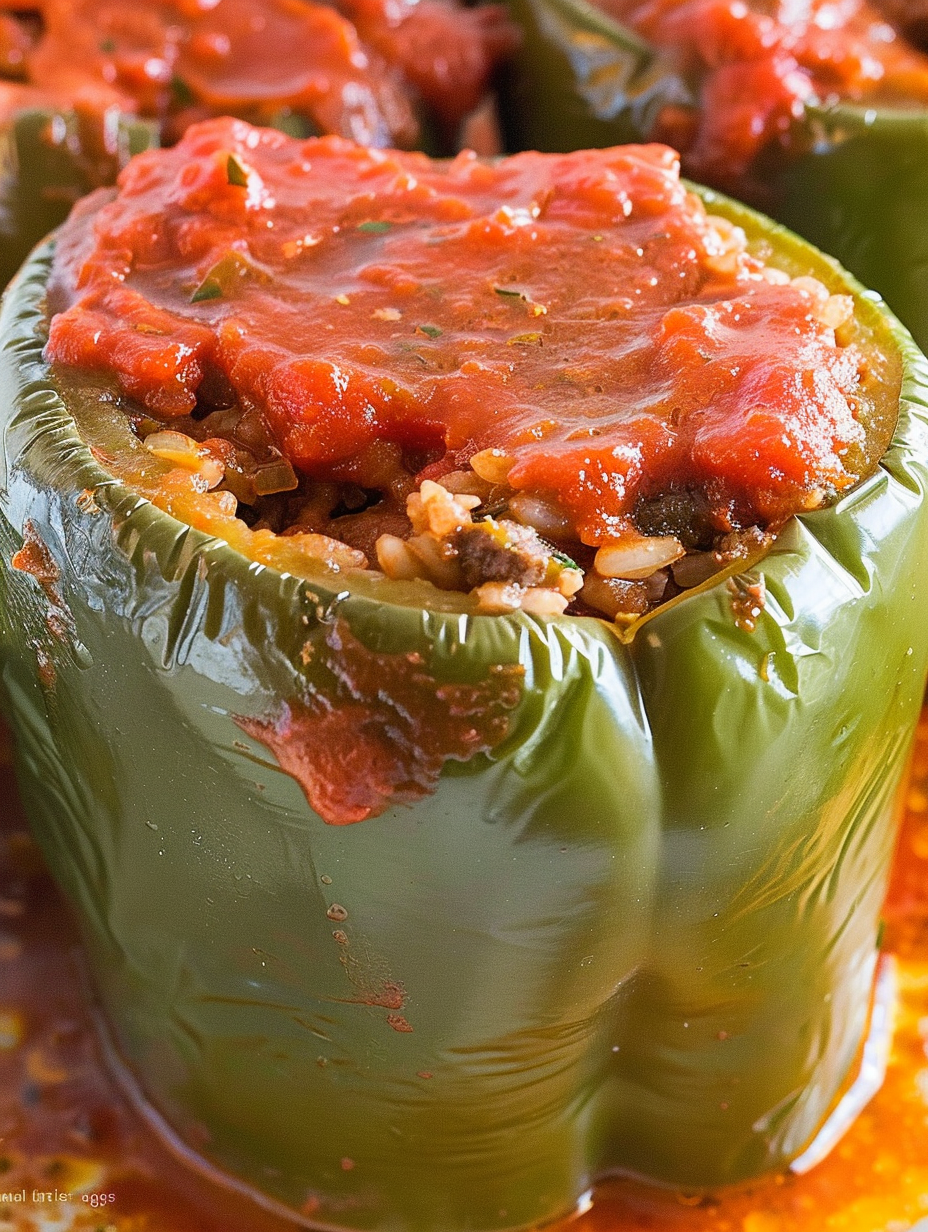
This stuffed peppers recipe has been a weekday lifesaver in my kitchen for years. I first discovered this combination on a busy week when the pantry had to stretch and the freezer needed stocking. The result was unexpectedly comforting: the sweetness of roasted green bell peppers paired with a savory, well-seasoned beef and rice filling, all moistened with a simple tomato sauce. Every time I make this, the house fills with a familiar aroma that draws my family to the table and sparks those small, happy conversations that make dinner feel special.
I love it because it is at once humble and celebratory. The textures work: tender roasted pepper envelopes that give slightly when you bite, a meaty filling that remains moist without being greasy, and a bright tomato topping that ties everything together. I often cook a double batch and freeze half for nights when I need dinner with zero fuss. This version is tailored to be approachable, freezer-friendly, and rooted in practical techniques that yield consistent results. Serving six generous portions, it feeds a family easily or makes for excellent leftovers the next day.
On weeknights when time is tight, this dish has saved dinners and stretched a modest grocery haul into satisfying meals. My kids insist on helping stuff the peppers, which makes the assembly feel festive. When guests arrive, I microwave a pepper for a quick taste and they always ask for the recipe.

My favorite thing about these peppers is how forgiving they are. The filling is very adaptable, and every time I tweak the herbs or swap in a different rice the family still loves the result. At potlucks they disappear first. I have a memory of bringing a tray to a neighbor who had just had surgery and hearing that the leftovers were a lifesaver for several nights.
Cool leftovers to room temperature no more than two hours after baking, then store in airtight containers in the refrigerator for up to four days. For long-term storage, freeze individual peppers flat in freezer-safe containers or bags. Thaw overnight in the refrigerator before reheating. To reheat from frozen, cover with foil and bake at 350°F for 40 to 50 minutes until heated through. Reheating gently avoids drying the filling.
Swap ground turkey or chicken for beef to reduce saturated fat. For a vegetarian option, use a mix of lentils and chopped mushrooms with a teaspoon of soy sauce for umami. Substitute cooked quinoa or cauliflower rice for a lower-carb filling; note that quinoa will absorb more liquid and cauliflower rice cooks down, so reduce added sauce slightly.
Serve stuffed peppers with a crisp green salad and crusty bread to soak up sauce. A dollop of plain yogurt or sour cream complements the tomato notes if you enjoy a creamy contrast. Garnish with chopped parsley or chives for brightness. These peppers also pair well with roasted winter squash in cooler months and a light cucumber salad in summer.

Stuffed vegetables are a universal comfort found across many cuisines. In the United States, stuffed bell peppers became popular as an economical, complete meal that combines protein, grains, and vegetables in one vessel. The idea likely traveled with immigrants who adapted stuffed vegetable traditions from Eastern Europe and the Mediterranean into local produce and pantry staples.
In summer, try using a mix of red, yellow, and orange peppers for sweeter notes and a colorful presentation. In colder months, enrich the filling with roasted root vegetables or swap tomato sauce for a spiced tomato-base with smoked paprika for warmth. Add seasonal herbs like basil in summer or thyme in winter for a seasonal touch.
Make the filling up to two days ahead and store it separately. Par-bake peppers and refrigerate them stacked upright with paper towels between to keep moisture in check. For freezing, assemble peppers on a baking sheet first so they freeze solid before transferring to bags. Label containers with reheating instructions so busy weeknights are truly simple.
These stuffed peppers are the sort of meal that becomes part of the regular rotation because they are reliable, adaptable, and genuinely satisfying. Whether feeding a busy family or packing the freezer for later, this method will give you consistent, delicious results. Enjoy making them your own and sharing them around the table.
Par-bake the peppers to prevent a crunchy interior after stuffing and final baking.
Use day-old or chilled cooked rice so the filling does not become mushy.
Freeze assembled peppers on a sheet pan until solid before bagging to preserve shape.
If using lean ground beef, add 1 tablespoon olive oil while browning to keep filling moist.
This nourishing classic beef and rice stuffed peppers recipe is sure to be a staple in your kitchen. Enjoy every moist, high protein slice — it is perfect for breakfast or as a wholesome snack any time.
This Classic Beef and Rice Stuffed Peppers recipe makes perfectly juicy, tender, and flavorful steak every time! Serve with potatoes and a side salad for an unforgettable dinner in under 30 minutes.
Trim the tops off six green bell peppers and remove seeds and membranes. Rinse and pat dry. Reserve the tops to use as lids after stuffing.
Place the peppers upright in a casserole dish or on a baking sheet and roast at 400°F for 20 minutes until just beginning to soften but still holding shape.
In a hot cast iron skillet, brown two pounds of ground beef until no longer pink, about 6 to 8 minutes. Season with 1 teaspoon granulated garlic, 1 teaspoon dried parsley, 1 teaspoon kosher salt, and 1/2 teaspoon black pepper.
Stir one cup of tomato sauce into the browned beef along with two cups of cooked rice. Combine thoroughly and taste for seasoning.
Remove par-baked peppers from the oven and fill each with the beef and rice mixture. Replace pepper tops and pour the remaining tomato sauce over the peppers and around the dish.
Cover with foil and bake at 375°F for 30 minutes. Remove foil and bake an additional 10 minutes to concentrate flavors. Let rest 5 to 10 minutes before serving.
Combine the remaining tomato sauce with 1 teaspoon granulated garlic and kosher salt to taste. Use part in the filling and the rest to top the peppers prior to baking.
Last Step: Please leave a rating and comment letting us know how you liked this recipe! This helps our business to thrive and continue providing free, high-quality recipes for you.
Leave a comment & rating below or tag
@silksavor on social media!

Tender baked salmon crowned with a garlicky Parmesan herb crust, bright lemon, and buttery crunch. Simple to make, stunning to serve, and irresistibly flavorful.

Buttery graham crust, silky cheesecake, and cinnamon-kissed apples under a crunchy crumb, finished with glossy caramel. A fall crowd-pleaser you will crave.

Tender green beans in silky mushroom cream, crowned with crispy onions. A comforting holiday side made entirely from scratch that always disappears fast.
Leave a comment & rating below or tag @silksavor on social media!
Enjoyed this recipe? Share it with friends and family, and don't forget to leave a review!
This recipe looks amazing! Can't wait to try it.
Comments are stored locally in your browser. Server comments are displayed alongside your local comments.

Join to receive our email series which contains a round-up of some of our quick and easy family favorite recipes.
