
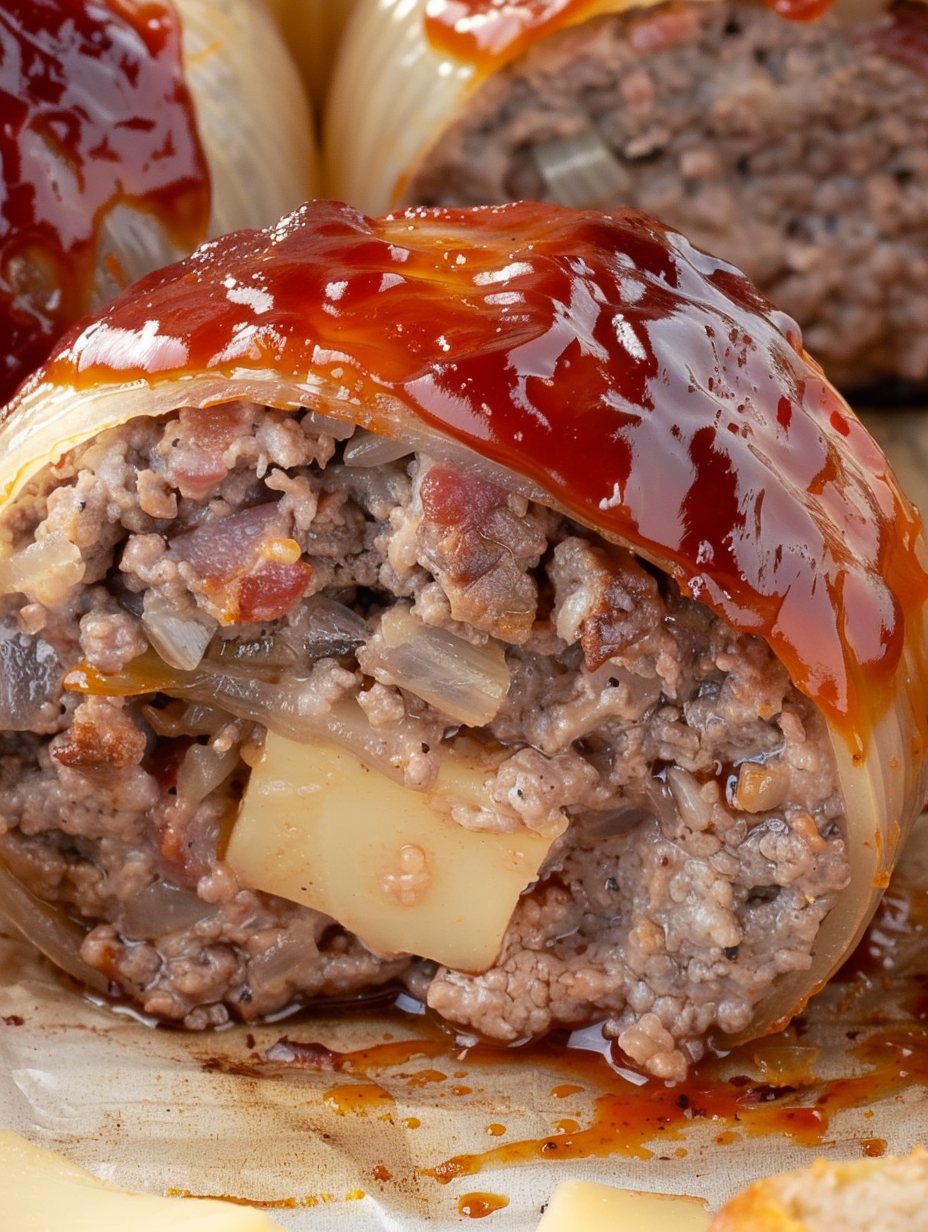
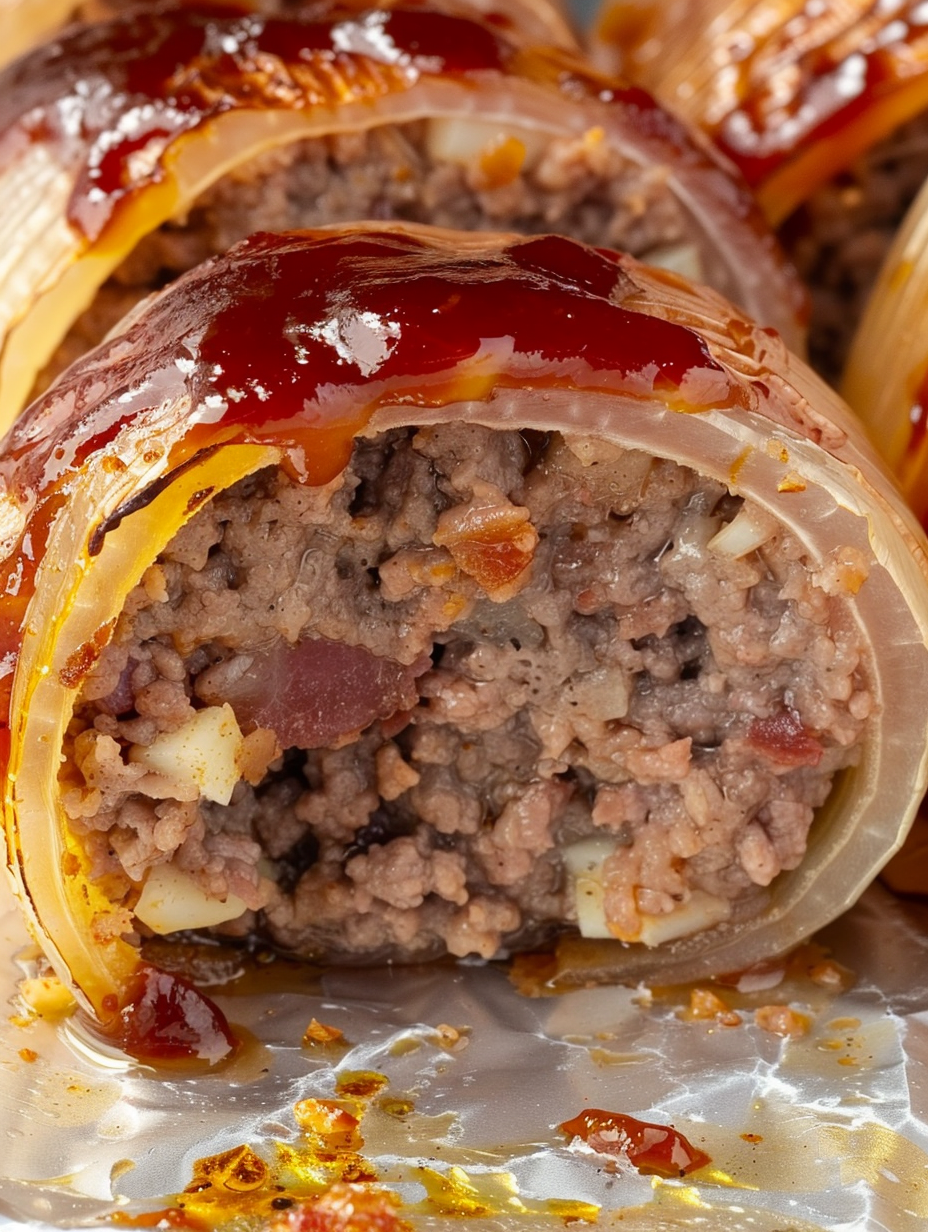
Onion Bombs — Bacon-Wrapped BBQ Beef & Cheese

Juicy beef and melty cheddar tucked inside onion layers, wrapped in smoky bacon and brushed with a caramelized barbecue glaze — a show-stopping appetizer or main.
Why You'll Love This Recipe
- Easy-to-source ingredients: classic pantry items like ground beef, onions, cheddar, bacon, and bottled barbecue sauce make this doable any night of the week.
- Show-stopping presentation: each portion looks like a little savory package — great for parties and potlucks without fuss.
- Make-ahead friendly: assemble up to a day in advance and refrigerate on the baking sheet for quick finishing.
- Balance of flavors: sweet onions, smoky bacon, and tangy-sweet barbecue glaze create layered, crowd-pleasing tastes.
- Fast to bake: ready in roughly 65 minutes from start to finish and serves a group of 8.
- Kid-approved and flexible: swap cheeses or sauces for personal preference and dietary needs.
My family reaction the first time I served these was immediate — silence followed by enthusiastic “more please.” They’re one of those recipes I pull out when I want to impress without sweating small details. I recommend using a trusted barbecue sauce like Sweet Baby Ray’s for a reliably balanced glaze, but a homemade sauce will also shine.
Ingredients
- Yellow onions: 4 medium yellow onions — you will use the outer two layers from each onion (the largest halves). Choose onions that are firm and evenly shaped so the layers separate cleanly.
- Ground beef: 2 lb lean ground beef (93% lean / 7% fat) — this ratio holds juices without being overly greasy; very lean blends will dry out and fattier blends may overflow while baking.
- Bread crumbs: 1/2 cup plain dry breadcrumbs — helps bind the mixture and absorb excess moisture so the beef forms a tight seal around the cheese.
- Egg: 1 large egg — adds structure and helps the filling adhere around the cheese center.
- Whole milk: 1/4 cup whole milk — hydrates the crumbs and keeps the filling tender and juicy.
- Barbecue sauce: 1/3 cup plus 3 tbsp bottled barbecue sauce (we used Sweet Baby Ray’s original) — 3 tbsp mixes into the meat for depth; 1/3 cup is for brushing to create a caramelized finish.
- Seasonings: 1 tsp garlic powder, 1 tsp onion powder, 1 tsp salt, 1/4 tsp black pepper — simple seasoning so the barbecue glaze and bacon can shine.
- Cheddar cubes: 8 cheddar cheese cubes, 1-inch sized — use a firm, sharp cheddar so the cheese melts luxuriously without becoming too runny.
- Bacon: 16 pieces center-cut smoked bacon — two pieces per onion bomb, laid in an X and wrapped snugly to hold everything together.
Instructions
Preheat and prepare: Preheat the oven to 425°F. Line a large-rimmed baking sheet with aluminum foil for easier cleanup and to reflect heat for a crispier bacon finish. Arrange a wire rack on the pan if you prefer the bacon to crisp more evenly underneath, but placing directly on foil works well. Prepare the onion shells: Slice the top and bottom off each onion and remove outer skin. Halve each onion from top to bottom and gently separate the two outer layers from each half — these large curved pieces form the shell. If the layers resist, soak the onions in hot water for 3–4 minutes to loosen them. You should end with 8 pairs of half-shells. Mix the beef filling: Combine the ground beef, breadcrumbs, egg, milk, 3 tablespoons barbecue sauce, garlic powder, onion powder, salt, and black pepper in a large bowl. Mix by hand or with a wooden spoon until just combined — overworking will tighten the meat and yield a tougher result. Form cheese-stuffed meatballs: Divide the mixture into 8 equal portions. Flatten one portion into a 3–4-inch disc in your palm, place a cheddar cube in the center, then fold the meat up and around the cheese, sealing it completely to form a large meatball. Tuck seams underneath so the top is smooth. Assemble with onion and bacon: Place one separated onion half on each side of the meatball so the curved layers encase most of the surface. Lay two pieces of bacon in an X on your work surface, set the onion-encased meatball in the center, then wrap the bacon around, pulling tight and tucking or securing with a toothpick if needed. Transfer to the prepared sheet and repeat. Initial bake and glaze: Bake for 30 minutes at 425°F. Remove and brush the top and sides generously with the remaining 1/3 cup barbecue sauce. Return to the oven and bake an additional 10–15 minutes until the glaze caramelizes, bacon is golden and crisp, and the internal temperature registers 160–165°F in the center meatball. Rest and serve: Let rest for 5 minutes to let the juices redistribute and the cheese settle slightly. Serve warm, with extra barbecue sauce on the side. If you used toothpicks, remove them before eating.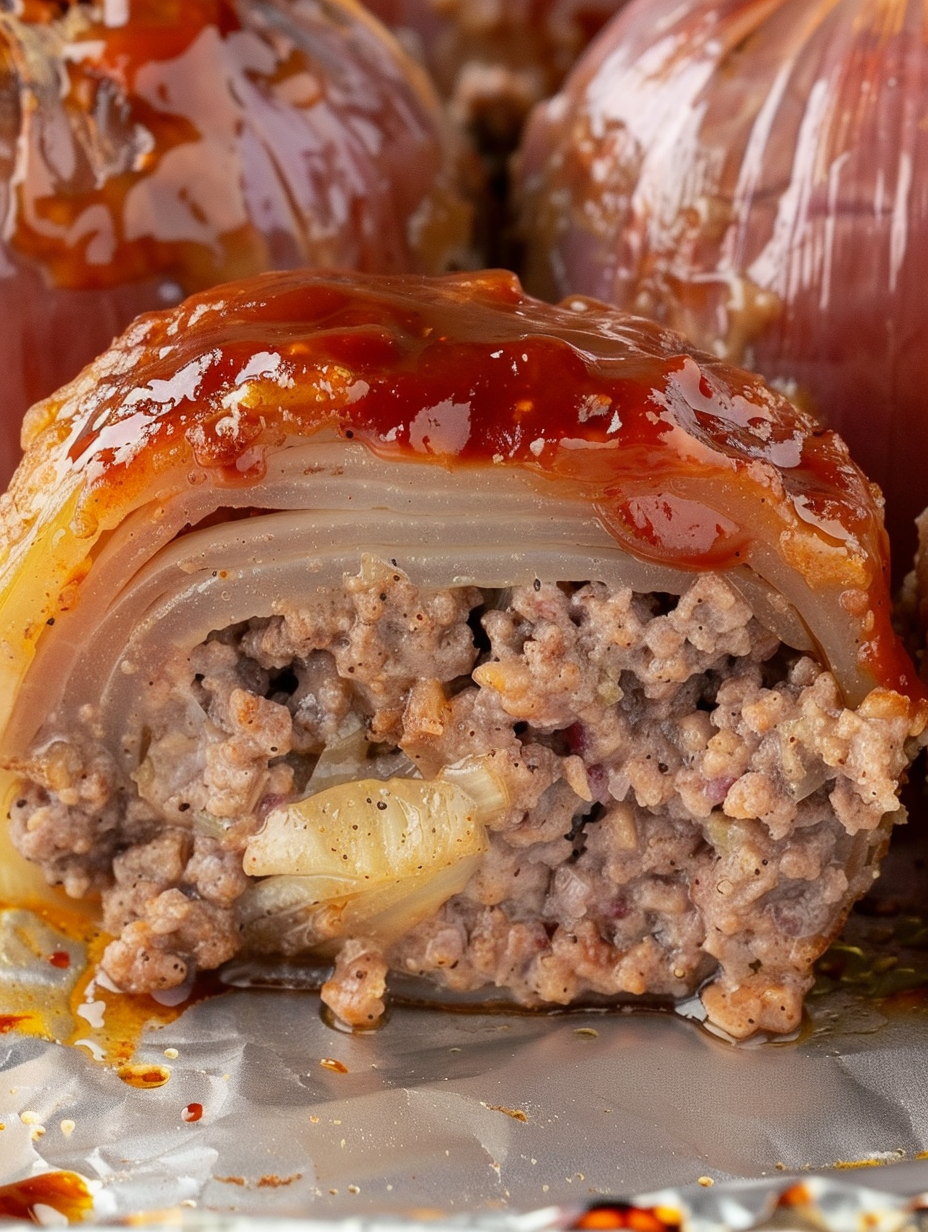
You Must Know
- Nutrition snapshot: about 438 kcal per serving with 33 g protein — a higher-protein, satisfying option for gatherings.
- Storage: refrigerate leftovers in an airtight container up to 3 days; freeze baked bombs for up to 3 months.
- Doneness check: use a meat thermometer to reach 160–165°F; visual cues include crispy bacon and fork-tender onions.
- Make-ahead tip: assemble and refrigerate on the baking sheet, uncovered, for up to 24 hours before baking to save time.
My favorite aspect is how versatile these are — I once turned them into sliders by slicing smaller rounds and serving on mini rolls at a summer cookout. Family members debated whether the bacon or the melted cheddar was the star; my answer is always both. These little parcels consistently draw compliments and requests for the recipe, which never gets old.
Storage Tips
Store cooled onion bombs in an airtight container in the refrigerator for up to 3 days. To freeze, wrap each bomb individually in plastic wrap and place in a freezer-safe bag for up to 3 months. Reheat from frozen in a 350°F oven for 25–30 minutes until heated through and the internal temperature reaches 165°F, or thaw in the fridge overnight and reheat for 15–20 minutes. For best texture, re-crisp the bacon under a broiler for 1–2 minutes while watching closely.
Ingredient Substitutions
If you need to swap ingredients, use panko breadcrumbs for a lighter binder (use the same volume). For a gluten-free version, substitute gluten-free breadcrumbs and verify your barbecue sauce is GF. Replace cheddar with pepper jack for heat, smoked gouda for extra smoky notes, or a dairy-free cheese alternative if avoiding dairy (note texture will vary). If you prefer turkey instead of beef, select 85% lean ground turkey and reduce baking time slightly to avoid drying.
Serving Suggestions
Serve these as finger food with toothpicks and extra barbecue sauce, or present as a main alongside a crisp green salad, roasted potatoes, or grilled corn. Garnish plates with chopped parsley or thinly sliced green onions for color. For a southern-inspired plate, add coleslaw and pickles; for a game-day spread, pair with oven fries and a selection of dipping sauces.
Cultural Background
These onion bombs are a playful offshoot of meat-stuffed vegetable dishes found across many cuisines — think stuffed peppers or kibbeh — but reimagined with American barbecue flavors. Wrapping bacon around meat parcels is a classic technique in American comfort cooking that adds smokiness and structural integrity. The glossy barbecue glaze evokes backyard grilling traditions, giving these an instantly familiar and nostalgic profile.
Meal Prep Tips
To save time, prepare the meat mixture and cheese cubes a day ahead. Separate and soak onion layers briefly just before assembly to make them more pliable. Assemble bombs on a lined baking sheet, cover loosely with plastic, and refrigerate until ready to bake. This workflow makes it easy to pop them into the oven while you finish side dishes or set the table.
These onion bombs are one of those recipes that travel well from weeknight to celebration. They deliver major flavor with minimal fuss and always spark conversation around the table. Give them a try the next time you want a comforting, shareable dish with plenty of personality — and don’t forget the extra barbecue sauce for dipping!
Pro Tips
Press and seal the meat tightly around the cheese cube to prevent leakage during baking.
Use a meat thermometer to confirm 160–165°F for the center meat portion for safe doneness.
Lay bacon in an X and wrap snugly; secure with toothpicks if necessary to keep everything intact.
Soak stubborn onion layers in hot water for 3–4 minutes to separate without breaking.
Brush barbecue sauce late in the bake to avoid burning and to achieve a glossy, caramelized finish.
This nourishing onion bombs — bacon-wrapped bbq beef & cheese recipe is sure to be a staple in your kitchen. Enjoy every moist, high protein slice — it is perfect for breakfast or as a wholesome snack any time.
FAQs about Recipes
What oven temperature and internal temperature should I use?
Use 425°F and bake until the internal temperature of the beef reaches 160–165°F; crispness of bacon and fork-tender onions are good visual checks.
Can I assemble these ahead of time?
Yes — assemble and refrigerate on the baking sheet, covered loosely, up to 24 hours. Bake from chilled, adding a few extra minutes if needed.
How do I freeze and reheat leftovers?
To freeze: wrap individually and freeze up to 3 months. Reheat from frozen at 350°F for 25–30 minutes or thaw overnight and reheat 15–20 minutes.
Tags
Onion Bombs — Bacon-Wrapped BBQ Beef & Cheese
This Onion Bombs — Bacon-Wrapped BBQ Beef & Cheese recipe makes perfectly juicy, tender, and flavorful steak every time! Serve with potatoes and a side salad for an unforgettable dinner in under 30 minutes.
Ingredients
Onion Shells
Meat Filling
Assembly & Finish
Instructions
Preheat and line pan
Preheat oven to 425°F and line a large rimmed baking sheet with aluminum foil. Optionally place a wire rack on the sheet for even bacon crisping.
Prepare onion shells
Trim tops and bottoms, peel skin, halve each onion, and separate the two outer layers from each half. Use hot water soak for 3–4 minutes if needed to separate without breaking.
Mix filling
Combine ground beef, breadcrumbs, egg, milk, 3 tbsp barbecue sauce, garlic powder, onion powder, salt, and pepper until just combined; avoid overmixing.
Form cheese-stuffed meatballs
Divide the mixture into 8 portions. Flatten each into a 3–4 inch disc, add a 1-inch cheddar cube to the center, and wrap the meat around the cheese, sealing seams underneath.
Assemble with onion and bacon
Place separated onion halves around the meatball, lay two bacon strips in an X, set the onion-encased meatball in the center, then wrap bacon snugly and secure with a toothpick if needed. Repeat for all portions.
Bake, glaze, and finish
Bake for 30 minutes at 425°F. Remove and brush each with 1/3 cup barbecue sauce, then return to the oven for 10–15 minutes until glaze is caramelized, bacon is golden, and internal temp reads 160–165°F.
Rest and serve
Allow the onion bombs to rest 5 minutes before serving. Serve warm with extra barbecue sauce on the side. Remove toothpicks prior to eating.
Last Step: Please leave a rating and comment letting us know how you liked this recipe! This helps our business to thrive and continue providing free, high-quality recipes for you.
Nutrition
Did You Make This?
Leave a comment & rating below or tag
@silksavor on social media!
Categories:
You might also like...

Parmesan Herb Crusted Salmon
Tender baked salmon crowned with a garlicky Parmesan herb crust, bright lemon, and buttery crunch. Simple to make, stunning to serve, and irresistibly flavorful.

Caramel Apple Cheesecake Bars
Buttery graham crust, silky cheesecake, and cinnamon-kissed apples under a crunchy crumb, finished with glossy caramel. A fall crowd-pleaser you will crave.

Homemade Green Bean Casserole
Tender green beans in silky mushroom cream, crowned with crispy onions. A comforting holiday side made entirely from scratch that always disappears fast.
Did You Make This?
Leave a comment & rating below or tag @silksavor on social media!
Rate This Recipe
Share This Recipe
Enjoyed this recipe? Share it with friends and family, and don't forget to leave a review!
Comments (1)
This recipe looks amazing! Can't wait to try it.
Comments are stored locally in your browser. Server comments are displayed alongside your local comments.

Hi, I'm Julia!
What's Popular

30-Minute Meals!
Join to receive our email series which contains a round-up of some of our quick and easy family favorite recipes.